I am beyond excited – thrilled – and maybe a bit crazy by this point – but, THE FINALE IS DONE!
Please read below for more on this. No time right now? Here is a pin to save and come back.

Want a fun way to use your scraps? Want to make a lot of little projects/toys that are great for little ones? Want to custom a special piece for a wee one? – and then end with one big finale? This project is for you! (And you can skip the big finale if it’s not for you and still have all the little toys and ABCs.)
This idea is completely customizable to your space or make up a smaller one. On tomorrow’s blog post, I will give you step by step instructions on how to make The Fun House Square that is on this piece and the big finale piece.

I haven’t added the letters/monograms to this particular example above, but that is the idea. I will be posting the square pattern tomorrow to keep this post from being so long. This would be such a cute nursery gift!! Make a pocket hanger with monograms and the toys that go with each initial.
I actually made one of these as a nursery gift. Here is a horizontal take on the same idea.

I have compiled the monograms/letters of this event in a convenient downloadable PDF if you prefer to print them out and have them all in one place. And my printable paid patterns contain a lot more photo tutorials to help you if you need.
I have the entire wall hanging finale in my ETSY shop with The Fun House Square RIGHT HERE.
The Finale PDF is 12 pages and contains everything you need except the letters to make any of the wall hangings.
If you’ve been waiting to purchase the PDFs until the end now is your chance!! I can’t even believe they are all finished or that I am giving away everything for this one small price.
MY ENTIRE COMPLETE SERIES OF THE TOYS PLUS A BUNCH OF EXTRAS IS NOW AVAILABLE.
There are OVER 60 patterns in this final bundle!!! 60+ toys patterns.
And MOST ALL of my PAID patterns contain way more photos and tutorials than what I can add to my blog post. I try to keep my fees very low.
If you prefer to shop on Ravelry for your patterns I also have the entire alphabet PDF over there. 
I will try to work on uploading these to Ravelry if you prefer Ravelry for your patterns, but it will be a while. If you are familiar with Ravelry, you may know that I have to upload each one separately over there – I can’t list bundles together so each and every small toy must have it’s own page. That will take me a while, but I will try to get it done. I don’t believe I will be able to do it all this year.
Make sure to check out THE ORIGINAL POST to link hop to each one of the FREE TOY PATTERNS here on my blog.
I want to say thank you for all who stop by to support my patterns and my blog. I have chosen to NOT do ads on my blog (with the exception of my affiliate links) and offer FREE patterns, but please – if you love my patterns and want to say a little thank you- or just have some good small business karma support points- a purchase now and then or a visit to any of my affiliate links really helps. It keeps this blog going so I can continue to offer free patterns for all to enjoy. I also purchase a pattern now and then or visit an affiliate link from my favorite blogs and designers. Thank you
This pattern is intended for personal use only. This pattern -and all my patterns- are offered for free or a small fee to help support my family so please do not redistribute, sell, copy or use them in any way not in accordance with fairness.
You may sell products made from this pattern, but please give me credit as the designer. Please do not use my photos as your own work, but you may use my photos to reference back to my blog, Etsy, Pinterest, IG or FB, but please link back to me.
If you find any problems with this pattern please let me know and if you have any problems with any of it feel free to message me and ask for support.
Kristi Bergin-Smith and The Burgundy Basket, 2020. Unauthorized use and/or duplication of this material without express and written permission from this site’s author and/or owner is strictly prohibited. Excerpts and links may be used, provided that full and clear credit is given to me, Kristi Bergin-Smith and The Burgundy Basket with appropriate and specific direction to the original content.

Stitches Guide: *US Terms apply
Chain: Ch
Stitch: St
Single Crochet: SC
Inc Sc or Inc or 2sc: make two single crochet stitches in the same stitch as indicated
Half-double Crochet: hdc
I encourage you to read all the way through this pattern to adjust your item for your space. I am going to give a bunch of details and tips on how to make this just right for you and your space and some modifications. The pattern for the Fun House Square will be posted tomorrow and I will link it back right here.
This is a fabulous stash busting project for all of that old Red Heart Super Saver and/or the same type of yarn – maybe even really old vintage yarn. It will require a LOT of yarn to make the exact example that I have made.
I have used 3 strands held together for this part of the wall hanging.
Yardage: Gauge is not important on this project, but please note that I have calculated yardage based on my gauge and material.
For each 13 rows you will need about 1280 yds of yarn if you are using the materials/hook that I am using. I measured this on rounds 63-75 when I used almost a whole skein of Bernat Super Value (426 yds) as one of my strands. So, if you do the math that is almost 11,000 yards of yarn!! This calculation is just for the back part / curtain part. This is a big piece – my example anyway – it is a great stash buster for old skeins of yarn like RHSS that is inexpensive.
Size L/8mm hook
Work colors from darker to lighter in the shades of the rainbow to achieve the look I have: red, oranges, yellows, greens, blues, purple, violet/pinks.
I chose 60”/5’ horizontally and 72”/6” vertically of wall space for my final project. That equates to about 12” for each letter square that I was adding at the end or each letter pocket. You can adjust this and adapt for more horizontal length and shorter vertical length or whatever size works for your space.
Don’t want to make the huge organizer? Look what a beautiful wall hanging/curtain this makes.

Here are a few combinations you can try that might work better for you, but adjust this to the size you need for your space. You can add different granny squares that you like and crochet appliques or anything to add to the final piece.
You can adjust the size of each letter pocket to make a smaller hanging or maybe even make up a few smaller pieces to hang separately.


You can even make this a floor playmat instead of a wall hanging. To do this just alter the direction that your squares “open.” Instead of having all the squares open from the top or side like on a wall hanging, maybe you lay yours on the floor and make the squares/pockets that open to the inside or outside.
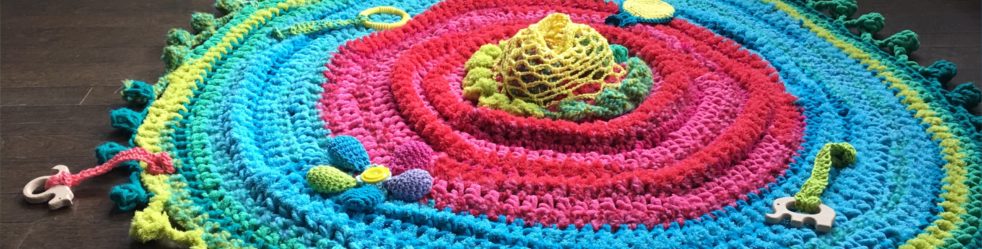
Or, instead of a playmat in a rectangle or square, you can make a circle? That might be my next project.

I figured 12” for each “box” or letter of the alphabet was the most useful size without being gigantic, but you can even do more if you have the room. I put the letters q/r and u/v together in my example. Please NOTE: this will be a heavy piece and you will need to hang it securely. More on that later.
For me, 145 chains gave me the length that I needed for 60” **please note that even though I measured my chain to be almost 60” and knowing it would grow a bit after working my rows, at the end mine measured 68”!! A bit bigger than I was going for, so adjust your chain accordingly and measure after a few rows to see if you need to adjust. This also made my yardage higher.
Gauge is not important, but you want a stiff fabric. Your wall hanging needs to be sturdy to hold weight of toys and other items like books.
Now, to help you figure out how to do your color changes, I’ll show you my math for my example:
For a vertical height of 72” and having 7 main color groups that I wanted use (red, orange, yellow, green, blue, purple, pinks) I divided 72/7 to get just over 10” per color segment. What that means if you are making an example like mine, is that I was going to be using all my “reds” for about 10” and then my oranges for about 10” etc. You want to transition the colors between each change for a blend so keep this in mind. You may be using less colors that I am and in each color block you may not have as many changes. You may also have less of one color than others – for example, if you have only a little bit of yellow, you may decide to make your yellow segment 8” and the green 12” etc. The gradient changes soften this look and keep it from being so blocky, but you may choose to have an abrupt all red – then all orange etc.
In my example, I will transition to my orange a few rows before I end my reds. You can see this in my photos below. There is no right or wrong for this project. I encourage you to go deep into your stash and grab all those old yarns you will not ever use. This is a great scrap yarn buster – just arrange your balls/skeins so you get a color change that you like.
Now, back to the “how” to make it. After you have the length of your starting chain: hdc in 2nd chain from hook and in each chain across. Chain 1 and turn. Not a stitch. Work in rows making a hdc in each stitch with a chain 1 and turn after each round.
Now that I’ve told you how to modify and change this for your space – here is how I did my EXACT example – row by row – color by color. Here are the colors that I’ve started with for my reds and oranges. My yarns all came from my deep stash – some had no labels, but ALL were equivalent to Red Heart Super Saver and the like for weight/size.
After you join a new color just crochet over the tails and you won’t have anything to weave in.

Rows 1-8: Caron One Pound Claret, Red Heart Super Saver (RHSS) Burgundy, and RHSS Cherry Red – change from the darkest red to a lighter red (me, Caron One Pound in Scarlet)
Rows 9-12: work the Burgundy, Cherry Red and Scarlet, but the Burgundy at the end of row 12 and join RHSS Pumpkin.
Rows 13-14: work the Cherry Red, Scarlet, and Pumpkin *this is where my Cherry Red was almost gone, so I added RH with Love in Tangerine
Rows 15-18: work Scarlet, Pumpkin and Tangerine – end off Scarlet and join RHSS Pumpkin Citrouille
You can see in this next photo how I planned my yellows and greens next. Lay them out so you go from dark to like and find a color that blends them together. For my example, I only had the smallest ball of the really light green on top so I decided to use it for one or two rows max between the light yellow and darker light green.

Rows 19-26: work the three shades of orange – cut darkest orange (for me that was the pumpkin) and join a gold color. I used Big Twist Soft in Gold
Rows 20-21: work the other two shades of orange and new gold color. Cut the next darkest orange. For me it was the RHSS Pumpkin Citrouille. Join lighter gold/dark yellow color.
Rows 22-23: work the lightest orange, and two dark yellow/golds. Cut the last orange and join yellow. If you are using as many shades of yellow as I am – join the next darkest yellow.
Rows 24-26: work 3 shades of yellow/gold. I ran out of the small ball of gold from the photo and joined the light yellow (RHSS in Lemon) at the end of this row.
Rows 27-34: work 3 shades of yellow/gold. I ran out of the other gold ball from the photo so I added another light yellow (Crafter’s Secret Pale Yellow -not in the photo) that was just a tad lighter than the lemon. Gold was done after row 34, so I added the small ball of the lightest green.
Rows 35-37: work two shades of light yellow and one of light green. Join next green at the end.
Row 38: work darker green and two shades of light yellow. I ran out of one of the light yellows at the end of this round so joined the 2nd green. I’ve started with the bright greens like RHSS in
Spring Green.
Rows 39-41: work one light yellow and two greens. Join primary/lemon yellow and cut light yellow.
Rows 42-45: Continue with two greens and primary yellow. Change one strand of the bright green to the next darkest green.
Rows 46-48: with primary yellow, bright green and regular green. Cut primary yellow at the end of this row.

You can see in this photo how I plan my “parallel” color changes. In addition to the primary colors – red, orange, yellow etc. You have secondary colors to blend each section together – so, maybe you have pink, peach, light yellow, mint, teal etc. As you cut one color you pick up another and are working 3 strands at once. So, now that I have cut my primary yellow and have a regular green and a bright green I am planning on my next changes – so, I’ll add the regular green that is a little darker than what I have on my hook now (bottom left in photo). This green is a good color to transition to my teals. You can see in my work basket on the left side are my transitions from this regular green to the teal and then blues. After I cut my bright green (on my hook now) I will use the olive green that is on the right bottom side of my work basket. These dark greens will also transition from a green teal to a darker blue (right side of my basket). This method is a great way to visualize your colors before you commit to them. It’s also a great way to add in smaller balls of scrap yarn. You just must ensure that you are using yarns with the same weight. RHSS, Stitch Studio and Caron are mainly what I am using, but there are a few more. Just make sure they all work up with the same size.
Rows 49-54: 3 greens now. Bright, medium and a bit darker. At the end of row 54, I cut the medium green and added a darker teal green.
Row 55: work in 3 greens.
Rows 56-57: work in 2 greens and 1st teal color. I have started with Stitch Studio in Deep Lake. At the end of row 57 I cut my bright green and added RHSS in Medium Thyme. This is an olive green.
Rows 58-61: work 3 shades of green/teal. At the end of this row I was almost out of the first dark teal green that I added in row 55, so I cut it and added RHSS Real Teal.
Row 62: work olive, real teal and deep lake (two teals and one dark green). I was almost out of the deep lake teal at the end of this row so I cut it and added Teal Heather by Bernat Super Value. **at this point my piece was right at 40” so I removed the last two greens from my work basket and went toward the blues next.
Row 63: on my example I am now working in two colors of teal and the very last bit of my olive-green color. At the end of this row I added a denim/medium blue yarn.
Rows 64-68: work in the Real Teal, Teal Heather and blue. I cut my Real Teal at the end of row 68 and added an aqua. ***NOTE HERE: I think this would be even better if instead of aqua you went with the rainbow blues – royal, indigo etc. I had none of those blues in my stash and was working this as a stash buster so I went with aqua and light blue, but feel free to change your blues here if you want.
Rows 69-71: in teal heather, aqua and blue. Cut medium blue and add light blue. I have used Soft Blue by I Love This Yarn.
Rows 72-75: work in light blue, teal heather and aqua. Cut teal heather after row 75. I have added Aruba Sea by RHSS.
Rows 76-78: work in light blue, light aqua and aqua. I had two large scrap balls I was adding next – one is a periwinkle blue and the other a dusky blue. At the end of row 78 I added the periwinkle and cut the aqua.
Rows 79-80: in light blue, light aqua and periwinkle. At the end of row 80, I cut the light blue and added the dusky blue.
Row 81: I worked in light teal, periwinkle and dusky blue. At the end of this row I was out of the periwinkle so I cut it and when I measured my piece, I was at 52” so I decided to cut the aqua as well to switch to purples. I added a lilac color and a smokey purple.
Rows 82-83: in dusky blue, lilac and smokey purple. Cut blue and add plum.
Row 84: in lilac, smokey purple and plum. I ran out of lilac here and added true purple.
Rows 85-92: in 3 purples now (light, medium and dark) – cut plum and join magenta. I used Vanna‘s Choice.
Rows 93-94: in smokey purple, purple and magenta. I cut the bright regular purple and added another magenta yarn. The second magenta is by RHSS and is a raspberry color.
Rows 95-97: work in two magentas and smokey purple. Cut purple and add another pink. I used RHSS in Lt Berry.
Row 98: work in the 3 magenta/raspberry colors. At the end of this row I was almost out of one of the magentas so I added a blush pink.
Rows 99-100: work in magenta, blush and raspberry. Cut other strand of magenta and add pink. I have added Impeccable in Soft Rose.
Rows 101-108: work in blush, raspberry and rose. Cut blush and add another pink. I used a bright medium pink.
Rows 109-110: work in raspberry, rose and pink.
After this row, I cut all the colors and worked a few rows in black and white for the top to attach to my rod.

If you make it this far you will know that this is heavy. Just turning it over at the end of each row gets rough. I found it was easier to handle if I did an accordion type fold and flipped it around each time. I am sure you will be able to figure out the best way for you. After you finish when you are planning your wall hang – you will need to secure this well.
I had my husband cut a strip of wood that I stained. We added 9 strong metal hooks into the strip of wood evenly and then securely screwed this into the studs of my wall. Then you just loop the hooks through the crochet. I wanted this piece to lay flat against the wall so this is why I did like this. In my original plan, I thought I would hang with a curtain rod, but I didn’t want it swinging out from the wall.
Even accounting for weight and stretch my final piece did stretch a bit further down than I accounted for so I had to raise up my crochet part on the hooks. When you measure and get ready to hang take into consideration stretch for weight. After all my pockets were sewed down my piece hung about 6 inches lower.
Helpful hints:
If you are using monograms, pin them in place before stitching them down.
Stitch everything in place before you sew. Everything. I made up each row of squares and then added my letter and then sewed a row down before moving onto the next row – but, even with all my careful measuring, I realized after the third row that if I was doing all squares I would have run out of room. So, measure and calculate, but finish all your squares and pin everything in place before you sew. If you want to modify the size of the squares and make them a tad bit smaller you can also skip round 20 of the square and finish with the round of sc.
I chose to make a few pockets in addition to squares for four reasons:
- I really wanted the “lmnop” to be all together the way we used to be taught to sing the alphabet. I hear they have now changed the alphabet song and it sound way wrong LOL – my original idea was to have all squares and only the lmnop pocket, but truth be told – truth -at the very end, I was just wanting to finish up.
- The pockets do work up faster.
- Visual interest – I wanted to switch it up and all squares seemed boring.
- I wanted to give you options – you can complete make a piece with NO squares and ONLY pockets.
I didn’t have any place in my house that was more convenient than the wall to assemble the final large project – so, I hung the curtain part and then pinned everything in place and then sewed the squares and pockets. It wasn’t hard at all like I thought. I just had one hand in back and one in the front and stitched in and out.
Orient the openings for the pockets how you think is best that makes the most sense for your orientation. On my large example, the upper pockets open from one side since it is high. I did the two left ones opening from the left side and the right ones open from the right side. The E, F and G open from the top. The H opens from the left and the K from the right, but the I and J open at the top. The “lmnop” pocket opens from the top and is stitched down the sides and in the middle in a few places to secure. The q/r and u/v pockets open from the top, but the s and t open from EACH side and are only closed on the top and bottom. And the bottom w, x, y and z pocket opens from the top like the other one.
Part 2 of this post with The Fun House Square free pattern and a bit more info on how I made the smaller hanging IS RIGHT HERE ON THIS BLOG POST.
Will you be joining in the fun? I’d love for you to make all of this with me, but if not pick a few and make it with me.
I’d love to see all your work or catch up with your progress so connect with me over on IG @theburgundybasket
#youandmeabccrochet
XOXO,
Kristi
Thank you so much for stopping by. I hope you are all enjoying this crazy, fun thing!! Catch up with me over @theburgundybasket on IG. I’d love to see you and your makes there.
Pin this post and come back for all of the A-Z toys! You can find a link to the original post below to start from the beginning!!

Discover more from The Burgundy Basket
Subscribe to get the latest posts sent to your email.
One thought on “You, Me and the ABCs : Crochet Wall Organizer: The Finale”