I have a new way for you to support my FREE PATTERNS!! I know many or most of you love supporting us makers – the truth is that is takes a long time to create a pattern and then write it and then edit it and get it proofed and tested – and then publish it – then you have to link it everywhere – its a lot of work, but us makers do what we do to share our love with you. And, if you have followed my blog you may know that I do not run ads on my blog so all my support comes from PDF purchases. Some of you don’t need to purchase the PDF of my patterns, but still want to say a quick Thank you – so, you can now support my blog and my work.

I have mentioned a few times here on my blog, that I have a Facebook page that serves as mainly a front for my local business at a fabulous artisan shop in my area called 3 Little Black Birds. I post on my business page everything that I am doing and what is finished. (My Facebook page is also called The Burgundy Basket and I try to inspire creativity there)
This year, I wanted my Facebook friends to challenge me and get me out of my normal comfort zone – and I was planning to crochet my alphabet patterns – so, I put the two together and invited them to challenge me for each letter of the alphabet. I started in January with the letter A and it is now June and I am just now on the letter E – so, obviously this is going to take a bit longer than anticipated – instead of a year, I am thinking more like 3 years! Ha! But, they have certainly challenged me with some fun things.
Some of my challenges that I can remember of the top of my head:
Afghans:
And I did my FIRST ever C2C afghan this year and used up scraps in a rainbow way:

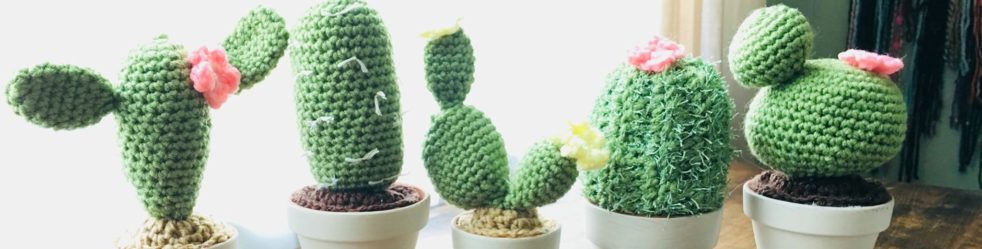
Cactus – I didn’t write up a pattern for this cactus I made. It was just freehanded and I did some crochet and sewed some in fabric. I did hold two strands of green yarn throughout the crochet part and added stuffing and a dowel in the middle to help them stay upright. The crocheted one on the left in the photo was worked in the back loop only like you would make cuffs.

This not only helped me make and design some fun new things for my new blog, but also kept me super busy and not in any creative slump. Knowing that I had this new blog to keep up with, I definitely wanted some fun inspiration and ideas. So, if you are in a creative slump maybe ask your own friends/family to challenge you with ideas. – and of course use Pinterest. It is the BEST place for ideas!
Some of my Farm Series patterns were created for this challenge and my entire DINOSAUR Family came from this challenge – because it was nowhere on my radar! I designed the whole family of five after getting the dinosaur challenge and I am so glad that I did – it is partially why I am so behind – but, Lord Longtooth Green is one of the most fabulous things I think that I’ve ever created with the exception of my children =) and he sits in my office and watches me daily.

So, when I got the challenge for “earrings” was excited and a little intimidated. I have never made any earrings before, so, I picked up what I thought I needed and got started. It did help that I was gifted with a huge bucket of crochet thread. I have NEVER used crochet thread before other than making amigurumi eyelashes and brows with it so it was going to be a big challenge. It required the wearing of reading glasses just to see the little hook and thread, but I am so excited about the end results. Now, I did write loosely what I did for each earring and hope this helps you to make up something fabulous! Most of my earring products and beads were purchased from Hobby Lobby and a few things from Joann’s. Basically, you need the actual earring post (I used the fishhook style) and the little O-rings/split rings to hold it all together. I got both the kind you open with pliers and the little rings that you have to rotate on like a key chain ring. You will want the kind you open with pliers to go through your crochet work since you can’t really twist the other kind on through your crochet. Here are things similar to what I used:


So, here you go. Let’s make some fun earrings! I am using the photos that I made for my Etsy so that you can see how big the earrings are and therefore adjust the size if you need – so, pardon all my selfies, but I was my only model available while I was working.

Style 1 was made in black thread and I used my B size crochet hook. I also crochet in a continuous spiral and do not chain up or join.
Chain 2.
Single crochet 6 in the second chain from the hook and work over your starting tail.
Starting in the first sc make 2 sc in that stitch and in each stitch around. (12) *Still work over the starting tail.
After getting done with all 12 sc for that round, pull the starting tail to cinch up the opening. You can now trim that tail or weave it in or just leave it if it will be on the inside of your work.
You want to move your stitch marker to the last stitch of each round so you know when you get to the end.
Round 3: (Make 1 sc in next stitch, make 2 sc in the next stitch) repeat around (18)
Round 4: (Make 1 sc in next 2 stitches, make 2 sc in the next stitch) repeat around (24)
Slip stitch in the next space and finish off. You will need to use a small needle and sew in your end.
For my tassels, I wrapped around a piece of cardboard that was about 4″ about 20 times. I made 3 and tied them on – one directly down from the earring and one on each side of that one 2 or 3 stitches over.
I am an avid audible listener. I’ve been using and listening to audible audiobooks since 2005. It is the only thing I listen to while working.

Style 2 is so fun! They sold almost immediately from my page. It is simple 3 circles joined together with a ring. I added a rhinestone charm I had, but this is optional. I used my D hook and 3 colors.
The little circle is:
Chain 2.
Single crochet 6 in the second chain from the hook and work over your starting tail.
Starting in the first sc make 2 sc in that stitch and in each stitch around. (12) *Still work over the starting tail.
After getting done with all 12 sc for that round, pull the starting tail to cinch up the opening. You can now trim that tail or weave it in or just leave it if it will be on the inside of your work.
You want to move your stitch marker to the last stitch of each round so you know when you get to the end.
Round 3: (Make 1 sc in next stitch, make 2 sc in the next stitch) repeat around (18)
The 2nd and 3rd circles use this pattern:
Starting/Increasing:
Chain 2.
Half double crochet 8 in the second chain from the hook and work over your starting tail.
Starting in the first hdc make 2 hdc in that stitch and in each stitch around. (16) *Still work over the starting tail.
After getting done with all 16 hdc for that round, pull the starting tail to cinch up the opening. You can now trim that tail or weave it in.
You want to move your stitch marker to the last stitch of each round so you know when you get to the end.
Round 3: (Make 1 hdc in next stitch, make 2 hdc in the next stitch) repeat around (24) *Finish off here for the second circle, but do next round for the big circle.
Round 4: (Make 1 hdc in next 2 stitches, make 2 hdc in the next stitch) repeat around (32)
Finish off for the large circle. Sew in all ends.

This style is so fun and I can see this made in holiday colors for a holiday party.
I used my E hook and 2 strands of white thread. I tied the thread onto my loop before I started and then chained 36. Starting in the 3rd chain from the hook, make 3 double crochet in each chain up to the metal ring that you started with and then slip stitch into loop and tie off and secure end. **You don’t have to start by tying on your thread – if you have the ring that you open with pliers you can just do this at the end, but when I made this pair I only had the split rings that twist on. You can also make these shorter by just chaining less at the beginning.

For this style, I used my B hook and an off white thread.
Starting/Increasing:
Chain 2.
Single crochet 6 in the second chain from the hook and work over your starting tail.
Starting in the first sc make 2 sc in that stitch and in each stitch around. (12) *Still work over the starting tail.
After getting done with all 12 sc for that round, pull the starting tail to cinch up the opening. You can now trim that tail or weave it in or just leave it if it will be on the inside of your work.
You want to move your stitch marker to the last stitch of each round so you know when you get to the end.
Round 3: (Make 1 sc in next stitch, make 2 sc in the next stitch) repeat around (18)
Round 4: (Make 1 sc in next 2 stitches, make 2 sc in the next stitch) repeat around (24)
Round 5: (Make 1 sc in next 3 stitches, make 2 sc in the next stitch) repeat around (30)
At the end I slip stitched on my metal ring and then finished off and sewed in my end. I did the tassell the same way as I did the first pair and added two beads before tying it on.

This style is super easy. Just follow any of the circle patterns above and add your beads and earring wire. I used a big assortment, but this part is up to you. I am not a “beader” or “jewelry” maker so I might not have done any of this part right, but just go to the beading and jewelry making department in your craft store and you will finds tons of things!

Style 6 is a simple granny square with 2 rows. I do my granny squares like this:
Chain 5 and join to form a circle.
Chain up 3 and then make 2 dc in the center of your circle.
(Chain 2, make 3 dc in the circle) repeat 2 times more for a total of 12 dc (the start up chain 3 counts as a dc)
Slip stitch to the top of your chain 3. Turn. Slip stitch into the chain 2 space. Chain up 3 and make 2 more double crochet into the space. Chain 2. Make 3 more double crochet into the same space. (Now, move to next chain 2 space and make 3 dc, chain 2, 3dc) repeat two times more. Slip stitch to the beginning and FO. Sew in your end.
I added some random beads and charms. This part is largely up to you. Just have fun!
I would love to see any and all of your work made from any of my patterns. Just comment here on my blog or find me over on IG @theburgundybasket
Discover more from The Burgundy Basket
Subscribe to get the latest posts sent to your email.
Love these earrings! Is it ok if I post what I make on my etsy? Love the design!
Of course!!! I share what I love just for this reason ❤️