Howdy!!!
I have a new way for you to support my FREE PATTERNS!! I know many or most of you love supporting us makers – the truth is that is takes a long time to create a pattern and then write it and then edit it and get it proofed and tested – and then publish it – then you have to link it everywhere – it’s a lot of work, but us makers do what we do to share our love with you. And, if you have followed my blog, you may know that I do not run ads on my blog, so all my support comes from PDF purchases. Some of you don’t need to purchase the PDF of my patterns but still want to say a quick Thank you – so, you can now support my blog and my work.
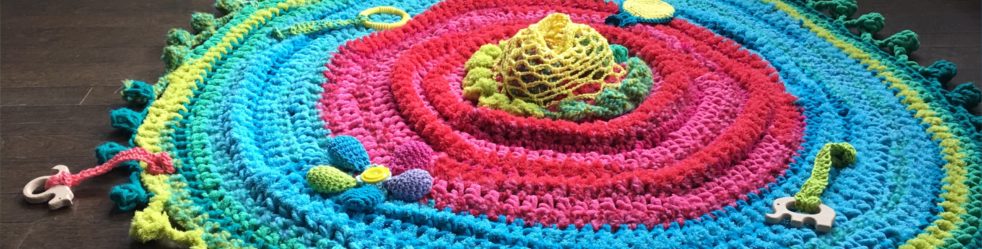
Fans of my Scraptastic patterns and series will hopefully LOVE this project. My scrap yarn basket was full again, so I had to clean it out!! But if you are new and missed my Scraptastic Summer Series hop on over and check it out!!!

Okay, here are the boring bits:
This pattern is intended for personal use only. This pattern -and all my patterns- are offered for free or a small fee to help support my family so please do not redistribute, sell, copy or use them in any way not in accordance with fairness.
You may sell products made from this pattern, but please give me credit as the designer. Please do not use my photos as your own work, but you may use my photos to reference back to my blog, Etsy, Pinterest, IG or FB, but please link back to me.
If you find any problems with this pattern, please let me know and if you have any problems with any of it feel free to message me and ask for support.
Kristi Bergin-Smith and The Burgundy Basket, 2023. Unauthorized use and/or duplication of this material without express and written permission from this site’s author and/or owner is strictly prohibited. Excerpts and links may be used, provided that full and clear credit is given to me, Kristi Bergin-Smith and The Burgundy Basket with appropriate and specific direction to the original content.

This is a stripped-down free version here on my blog. My 11-page PDF has over 30 instructional photos to make it a very beginner friendly pattern, but here on my blog it is a simple version with little photo support. There just is no way to put all those pictures here, but my PDF is super affordable if you want to jump over and grab a copy. It is available in my Ravelry Store and my Etsy Shop.

Stitches Guide: *US Terms apply.
Chain: Ch
Stitch: St
Single Crochet: SC
Inc Sc or Inc or 2sc: make two single crochet stitches in the same stitch as indicated.
MATERIALS: This pattern is written as a scrap yarn project and as such there IS NO YARDAGE listed, and no specific yarns required. You can use pretty much any weight of yarn and any length of scrap balls and pieces. The MAIN THING you want to do is try to keep the weight of yarn you are holding throughout the project somewhat consistent. I have used mainly medium weight worsted and Aran yarns like Impeccable and Red Heart With Love, but I have also mixed in some silk sports weight and some bulky weight yarns. You can choose almost any leftover scrap yarns, or you can even use new skeins of yarn. I have written this pattern to be very adaptable and made a few different examples for you to see how different yarn may work. Due to the nature of pillows, I do believe your yarn should be washable. You can see here what material I have started with.

Hook Size: I have used my size K/6.5 mm hook with the weight of yarn that I was holding, but you may need to change this based upon the weight of yarn you are using and your gauge. You want your stitches to be firm enough to have little to no gaps, but not so dense/tight like a rug that your pillow will be super stiff.
Stuffing: There are many options for stuffing your pillows. These pillows can be made small or large depending on how many rounds you do. You can buy/order round pillow inserts, sew your own liner and stuff or just use poly to stuff. I have done all 3 options for pillows. NOTE: you do want to buy/order a size larger than what you think you need if using a premade round pillow insert. You want the insert to be a bit larger than your pillow. If you are stuffing your own liner you do want to put a bit more stuffing than what you think you need as the stuffing will relax over time.
*Affiliate Links Below. I earn a small commission if you purchase through my links*
THESE ARE THE INSERTS that I have used in my pillows. They are 18″, but I also ordered and used THESE 24″ ONES FOR LARGER ONES. They are both really great inserts, but I do love the feather down ones the most!
YOU WILL BE MAKING TWO PIECES AND THEN JOINING THEM TOGETHER AFTER YOU ARE FINISHED.
This project is made holding at least two strands of yarn together throughout. Sometimes I choose to hold 3 strands and cover this in the PDF. I have made two different versions in my examples. I have two versions where I held the same strand of yarn in the same color throughout and changed my 2nd strand only. I have another version where both of my strands are scrap yarn strands (the rainbow one). In the two larger versions I have held a strand of off white in Caron One Pound and in the other a strand of cream in Red Heart Super Saver. **As you run out of one strand of yarn you join in a new strand. After joining your new yarn ball, crochet over the tails after tying them in a knot and then trim as you like.
Most all of my patterns are worked in the CONTINUOUS Round: I do not join and chain but continue to work in the next stitch. Use a stitch marker for this so you don’t lose your place. I will always note if this is not the case.
Pattern Note: If I write, “sc 3” it means single crochet in the next 3 stitches – whereas “3sc” means to make 3 single crochet in one stitch.
Pattern Note: (sc, 2sc) repeat around – this is read as you make a single crochet in the next stitch and then 2 sc in the next stitch and repeat this sequence around the entire round.
Another example, (sc 2, inv dec) repeat around. This is read as you make a single crochet in the next two stitches and then you do an invisible decrease and then you repeat this sequence all the way around.

Chain 2. Single crochet 6 in the second chain from the hook and work over your starting tail.
Starting in the first sc make 2 sc in that stitch and in each stitch around. (12) *Still work over the starting tail.
After getting done with all 12 sc for that round, pull the starting tail to cinch up the opening. You can now trim that tail or weave it in or just leave it if it will be on the inside of your work.
You want to move your stitch marker to the last stitch of each round so you know when you get to the end.
Round 3: (1 sc in next stitch, 2 sc in the next stitch) repeat around (18)
As you run out of yarn, join a new strand. I join my new strand of yarn the traditional way by pulling the last part of the stitch through with my new yarn. Tie the two tails together – the old tail and the new tail – and then work over those tails and then trim after working over them for 6-12 stitches to lock them in.
NOTE: Joining the new yarn is going on at the same time you are counting rounds. If you need to use a stitch marker at the end of each round to keep count, please do. You can choose to make each round its own color and change at the end of each round, but I work until my scrap yarn ball runs out and join in the new color. On the longer rounds at the end of the pattern you may even have multiple color changes in each round depending on your scrap balls.
Round 4: (1 sc in next 2 stitches, 2 sc in the next stitch) repeat around (24)
Round 5: (1 sc in next 3 stitches, 2 sc in the next stitch) repeat around (30)
Round 6: (1 sc in next 4 stitches, 2 sc in the next stitch) repeat around (36)
Round 7: (1 sc in next 5 stitches, 2 sc in the next stitch) repeat around (42)
Round 8: (1 sc in next 6 stitches, 2 sc in the next stitch) repeat around (48)
Round 9: (1 sc in next 7 stitches, 2 sc in the next stitch) repeat around (54)
Round 10: (1 sc in next 8 stitches, 2 sc in the next stitch) repeat around (60)

You see how working increases in this manner starts to slowly give you a hexagon shape? You can counter this by making a few extra sc along the way. You can make a few (1-3) after each round or you can just even it out as you go after a few rounds. After about 8 rounds I make 4-8 extra sc stitches and then start my next round. You can see in the above picture that I have made 4 extra sc stitches before I start my next round.
Round 11: (1 sc in next 9 stitches, 2 sc in the next stitch) repeat around (66)
Round 12: (1 sc in next 10 stitches, 2 sc in the next stitch) repeat around (72)
Round 13: (1 sc in next 11 stitches, 2 sc in the next stitch) repeat around (78)
Round 14: (1 sc in next 12 stitches, 2 sc in the next stitch) repeat around (84)
Round 15: (1 sc in next 13 stitches, 2 sc in the next stitch) repeat around (90)
See how it is getting kind of hexagonal again? Take a few extra sc stitches like we did earlier.

You keep working in the established pattern until you have the size circles that you want making sure to add a few extra stitches about every 5-6 rounds to even out the sides.
Round 16: (sc 14, 2sc)* around (96)
Round 17: (sc 15, 2sc)* around (102)
Round 18: (sc 16, 2sc)* around (108)
Round 19: (sc 17, 2sc)* around (114)
Round 20: (sc 18, 2sc)* around (120)
Round 21: (sc 19, 2sc)* around (126)
Round 22: (sc 20, 2sc)* around (132) **this is where I stopped for my two smaller examples, and I used 18” pillow inserts. Your size may vary from mine.
Round 23: (sc 21, 2sc)* around (138)
Round 24: (sc 22, 2sc)* around (144)
Round 25: (sc 23, 2sc)* around (150) **this is where I stopped increasing for my two larger examples and I used 24” pillow inserts, but your size may be different than mine. You can also keep going in the established pattern to make an even larger pillow or a rug!!
You will be making TWO PARTS. You make a top and a bottom. For the top make one more round of sc all the way around after you get done increasing.
So, Round 26 would be: sc in each stitch around. But you might have stopped before round 25 if making a smaller pillow so just make one final round of sc after you are finished increasing.
For the bottom do as many rows as you need for the thickness of your insert. I did 10 additional rows after I was done increasing. So, in my larger two examples, I have Rounds 26-35: sc in each stitch around.
PRO TIP: COUNT THE STITCHES FROM THE FIRST PART AND THEN THE SECOND PART BEFORE JOINING THEM TOGETHER. If you have found that you missed or added a stitch or two you can fix this in the end by doing an increase or decrease on the second part BEFORE YOU JOIN THEM.
You can choose to do whichever you like first, but DO NOT END/BREAK OFF YOUR YARN AFTER THE SECOND PART. YOU CAN JUST CONTINUE TO JOIN THE TWO PIECES together without ending off your yarn.
You may need to do more rounds if you have super thick pillows. Mine are large, but 10 rounds were enough for mine. You may also choose to make two equal sections. For example, instead of having 10 extra rows on one part and 1 extra row on the other part, you can do 5-6 rows extra on each section and have your join in the center. I have done both in my examples. Please see the pictures below.
You will have something like this when you are finished:

Here is an example where I made each part equal and join them in the center. This is nice if you will be adding pompoms like I have in this example so that the poms are in the middle of the pillow and not on one end.

After you have finished with both sections, weave in the ends for the piece you made first and then line up the top and bottom stitches to join. You can choose to sc or slip stitch the two pieces together. I like to slip stitch mine closed because I feel that it looks nicer at the end. You can insert or stuff your pillow at the spot where you are comfortable doing it. I usually slip stitch about ¾ of the pillow together and then fold and squish my insert in using my hand to tug and put it in the right place before continuing to close the pillows. Once you are finished end your yarn and tie off and weave in your ends.
There are endless possibilities of colors to choose from. Here are the fronts and backs of my 4 examples. In one of my smaller versions, I did a rainbow version where I started with all my rainbow-colored scrap balls with red and then orange and then yellow etc. on one side and started with purples and blues on the other side. The sides are mainly yellow and green. In the other version I used just blue and green with an off-white color and added pompoms. You can crochet the pompoms in on the last round of one side evenly spaced if they have an elastic loop or sew them on at the end.
For the fully detailed picture tutorial grab your PDF from my ETSY SHOP or my Ravelry Store
XOXO and thank you as always for choosing my pattern. Krisit


Discover more from The Burgundy Basket
Subscribe to get the latest posts sent to your email.