First, I wanted to say thank you to all who have joined this series!! I have had so much fun and hope you have as well. I hope you have several fun, new patterns anyway.
I am still working on the “big finale” and was hoping to be all the way done with it, but I have had a few weeks of being more busy that usual, so I am not all the way finished, but I do have several extras on the way while you wait and the pattern for my square to go with the finale. They are up soon so make sure you are following my blog to get updates.
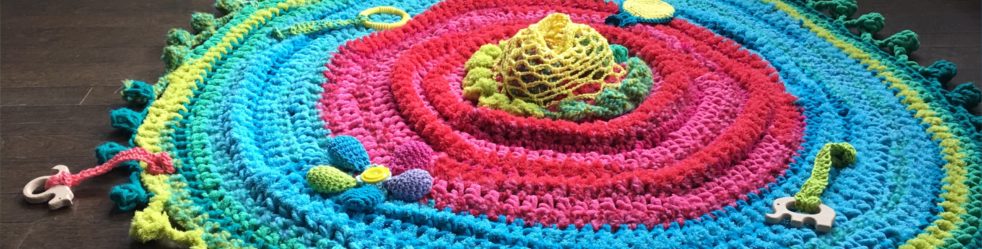
When I thought about the letter Z there were very few options to use. Since I was trying to stick with “sight words” and early education learning words, I really wanted to use Z is for Zipper, but obviously you can really crochet a zipper. I started thinking about ways to incorporate a real zipper into a crochet project, but in the end I decided that I really wanted to make a Fiddle/Activity mat instead.
This project is large and it might not be for you, but maybe you can take some inspiration from it and make up something smaller with parts and pieces of this one.
Please read below for more on this. No time right now? Here is a pin to save and come back.

Want a fun way to use your scraps? Want to make a lot of little projects/toys that are great for little ones? Want to custom a special piece for a wee one? – and then end with one big finale? This project is for you! (And you can skip the big finale if it’s not for you and still have all the little toys and ABCs.)
Want a sneak peek at just one of the final projects? This isn’t the huge finale, but it is a small idea:

The pattern for my “square” is coming soon. I *think* I have a name for it. *I haven’t added the letters/monograms to this particular example above, but that is the idea. I will be posting the square pattern soon for you to start making up some squares if you choose to make something like above. This would be such a cute nursery gift!! Make a pocket hanger with monograms and the toys that go with each initial.
I have compiled the first letters of this event in a convenient downloadable PDF if you prefer to print them out and have them all in one place. And my printable paid patterns contain a lot more photo tutorials to help you if you need.
You can find the toys for all the letters in my Etsy Shop. I have them broken down into smaller parts, but have just uploaded the final huge part.
Part 1: A-F HERE ON MY ETSY.
You can find Part 3 with the letters N-S
The last small part – Part 4 with the letters T-Z is now available.
If you’ve been waiting to purchase the PDFs until the end now is your chance!! I can’t even believe they are all finished or that I am giving away everything for this one small price.
MY ENTIRE COMPLETE SERIES PLUS A BUNCH OF EXTRAS IS NOW AVAILABLE.
There are OVER 60 patterns in that final bundle!!! 60+ toys patterns.
And MOST ALL of my PAID patterns contain way more photos and tutorials than what I can add to my blog post. I try to keep my fees very low.
This project was in my head as I was designing all of these letters and I’m so excited to get this series finished! Won’t you join me? If you prefer to shop on Ravelry for your patterns I also have the entire alphabet PDF over there. 
I will try to work on uploading these to Ravelry if you prefer Ravelry for your patterns, but it will be a while. If you are familiar with Ravelry, you may know that I have to upload each one separately over there – I can’t list bundles together so each and every small toy must have it’s own page. That will take me a while, but I will try to get it done. I don’t believe I will be able to do it all this year.
I’m gonna give you some options at the end to make the final part right for you/your space. Make sure to check out THE ORIGINAL POST to link hop to each one of the patterns here on my blog.
Here are some of the latest patterns that are all free here on my blog. I will be keeping THIS ORIGINAL POST updated with all the links for all of the toys.

This post does contain affiliate links. I will get a small percentage from any purchase made through my page here, but your price remains the same. I appreciate any purchase made through my page as I can continue to offer free patterns here on my blog.
Did you miss V is for Vampire Bat? It has been well received and is perfect for Halloween this year! Thank you.
I’ve made the Crochet Bat pattern a quick PDF that you can purchase from my Etsy or Ravelry.
Etsy is HERE and Ravelry

You can also find V is for Vegetables and Vampire for this series.
And my last post was W is for Whale <3

For an easy printable PDF for W is for WHALE – in the 3-sizes – I have them listed in both my Etsy and Ravelry shops. You can find the easy 7-page PDF in my ETSY HERE or also over on Ravelry.
Zebra Want just the Zebra PDF? You can find it HERE IN MY ETSY SHOP.
UPDATE: Z is for Zipper: Oct. 5, 2020

Zipper Fiddle Activity Mat:
First, of all – you do not need to be a seamstress. At best, I am an okay “sewer.” I can sew two pieces of fabric together and sometimes in a straight line. Perfection is not required for this project – just the ability to somewhat sew in a line. You do NOT want to skip pinning. Pinning in place is probably more important than the actual sewing. I am a very basic sewer with very basic skills and an old Kenmore machine that I’ve probably had for 20 years. You will notice that my project is not perfect. Again, perfection is not required.
IF YOU DO NOT HAVE ANY TYPE OF SEWING MACHINE: If you do not have a machine, you can do just one easy panel by using a precut large piece of felt (available in most craft stores) and hand stitch some items on using this for inspiration.
Things that might come in useful: rotary cutter and mat, pins, fabric scissors.
Materials that you might use. Feel free to add different ones: UNWIRED ribbons/scraps of ribbons, assorted remnants of fabric including see through mesh type fabric like tulle, gossamer bags, zippered pouches, wooden baby rings, old clothing, crinkle paper, rattle and squeaker toy inserts, soft toys, baby toys, pet toys (the elephant squeaky toy in my example is a dog toy), large plastic child beads, clear shower curtain liner, large plastic buttons, old colorful socks (I used a black and white striped one that had colorful monsters), dust mitt, filler materials like foam beads and sequins if you are using a material that will hold them inside, and assorted zippers. These are just some possibilities. I am sure you can come up with even more ideas. Some of my items came from my local dollar store and some of the remnant section of my local fabric store. Many – MOST – came from my stash/craft closet.


You may see some items in my photos below that I did not use – I just had so much that I didn’t get to everything. For example, I thought it would be neat to sew the magnetic tape into a light weight piece of fabric to use for some large magnetic alphabet letters or something and then store the magnets in one of the pouches, but I just ran out of room. I also planned on sewing a piece of elastic into a piece of material and adding a little toy on the end of the elastic. Again, I ran out of room. I am sure you can also come up with some fun options.
NO MATTER HOW WELL YOU SEW THIS ITEM, IF YOU USE ANYTHING LIKE THE BEADS SUPERVISION FOR PLAY SHOULD ALWAYS BE USED with SMALL CHILDREN.

Wash and dry all fabric first – iron if needed. You will want this project to be washable. Keep that in mind as you proceed. My finished project is bulky, but I can wash it on gentle in my top loader.
I recommend a felt type “backing” for each “square” or section to use as a template. You can get large precut pieces or you can get material and size each section to the size you want. You can do large sections or small ones, BUT I recommend keeping them all the same size so you can join them later. You will join them kind of like a quilt.
I used a piece of large plastic mesh that I found at my local JoAnn’s store that was about 13×22 as a rough template to size and cut my squares and fabric.

Spread out in a large area to plan. Look at your pile of loot and plan each section and adapt your materials to those – add different fabrics, toys etc. Use your area to lay out the pieces and parts that you want to use together. Here are my sections to give you some ideas:

Flannel square: trim shirt to size and pin together.
I first put some crinkle paper into the pockets and then added a long piece of ribbon. Pin this in place.
Sewing order: down the right side of the buttons (I wanted the buttons to work and be able to be opened and closed), then down the right side of the shirt, then down the length of the ribbon, and then down the left side of the shirt – then horizontal on the top and bottom. I also sewed the tops of the pockets down under the flap because I wanted working pockets, but I didn’t want anything to be able to go inside the pockets since they were stuffed with crinkle paper. Then sew down embellishments.


Buttons Square: This was one of the easiest because I started with a precut piece of felt. I chose mostly buttons that had 4 holes so I could make multiple knots and passes for security. Use a worsted weight yarn and needle to pull through button in two holes – tie a good knot in back at least twice, pull through other two holes and tie a couple more good knot for safety. Use a dab of glue on the back if you feel it’s needed.
Sew ribbon scraps to one side, sew zipper pouch down on the opposite side from the zipper so it works as a pouch, sew ribbon across on each side after pulling a wooden ring onto it and sew sock with squeaky toys inside. Sew down center of sock for safety to keep any heads from being able to get under. You only want to be able to get your fingers under the items so attach where needed for safety.

Sequin and Foam Bead Square:
I also started this square with a precut piece of felt. I began this one by using some colored tulle to make a pouch that is sewed all the way around, but fill with foam beads, plastic beads etc before making the final stitches. I found a piece of this fun sequin material that you may have seen on pillow – you can brush it one way and then the other way – so, I next sewed this all the way around, but left plenty one the edges to keep the sequins from falling off the main square. I only had one little short zipper so I added it here, then some ribbon to trim the sequin fabric, and some fun pompom yarn that I had. The last thing I did was add some red satin type material to the upper part of the square for added texture.

Elephant Toy Square:
This was also a pretty simple square. I cut some orange fabric into the size I needed and for extra durability added a piece of felt to the back that was the same size. After I sewed the pieces together, I sewed the toy across the body to keep secure and then stuffed this little gossamer bag with fun and sewed many times across the top of the bag after I tied it shut. The last little embellishment is a crochet circle made from assorted color scraps and some spiral pieces. This are just a chain of about 21 with 3dc in each chain. Sew this piece on.


For this Frog and Bead Square, I started with this super fun and soft bumpy fabric. Trim and sew to felt backing for stability.
I sewed another little pouch and made some more crochet spirals. These are longer spirals – about 40 chains with 3dc in each chain. After I added the beads and sewed the string down, I realized that a head could get stuck in here so I sewed through the middle of the string to hold it down.


Denim Square: When I was planning this denim square, I originally intended to leave the pocket open so it could hold a little stuffed animal (this is where I originally envisioned putting a little stuffed animal on a piece of elastic wrapped in fabric), but I really didn’t have a better place to add this little sequin pouch that I sewed from a clear, thick shower curtain liner so this is where it went, but I still think a little stuffie would be cute in the pocket – like a bunny.
I’ve added sequins, bells and some pompom trim inside this clear pouch.
I paired the denim with this fun shiny fabric that is cool to the touch.
Sew denim, pouch, and ribbons. If you are going to use a wooden ring like I have make sure to add that before sewing the ribbon down.


These next steps will likely be the most time consuming and tedious.
*trim all sections around the edges leaving a seam allowance. Cut out long strips of fabric to go between each section both vertically and horizontally. PIN PIN PIN !!
Pinning at this point is super important. Remember when you are placing the fabric to sew your sections together that you need to leave some space for the piece of fabric that will join them the other direction. Hopefully these photos will be of help.
Pin one strip of fabric to square in one direction leaving the amount of space you want between the squares and sew.

Pin and sew the opposite side. Think carefully about right side/wrong side and pin. Sew the next side.

Do the same for the other sides. Don’t forget – we aren’t going to perfect – don’t think about quilt shop perfection – this is a fun play mat for your little one.

After the sections are finished trim the edges. This is where your rotary blade and mat might be helpful.
Once you get all of this done – add those zippers! After all, this started out as a Zipper project 😉
I used 18-inch zippers, but you can use whatever you like. I chose this size only because my local store only had a wide variety of colors in this size and at the time that I was planning this project, I wasn’t sure just how I was going to finalize it. I originally thought about making each section where you can unzip them and move them around and zip into a new configuration – and doing that would be amazing! However, I just don’t have those skills. You would have to be able to sew the zipper into all four (or at least two) sides and have both sides finished for that to work right – and my sewing skills are just not that good.
So, I added the zippers after and sewed them so they are secure, but can still be zipped and unzipped.
The next steps are backing and binding the edges. This part is pretty easy, but just go slow and orderly – especially if you have not done this before. The pictures below might help – I’ve left them large for you to be able to see.
Place backing fabric down with the wrong side up. (top left photo below) Place batting onto the fabric. (top right photo below) Place the activity mat right side up so that it makes a big sandwich. (bottom left photo below) Pin in place.
I laid it all out smooth onto my floor.
Since there is so much on this mat, you can’t really quilt this in any type of traditional manner, so tie it. Use some thread and needle and start at the top, go down through the layers, come out the bottom, move over just a hair and come back up through the layer to the top and tie. Leave at least an inch and cut. Easy. Just do this about every 6-8 inches in the mat. I find it easiest to roll on side up and start at the middle and unroll as I go.

After you get everything tied – trim the batting material even with the top activity layer. (next photo bottom left)
Next, trim the bottom backing fabric with a few inches around because you will use these edges as your quilt binding. (bottom right photo)

At this point, I like to take this to my iron and iron the outer edge that will be my binding with a neat crease. (see photo below)
You will be folding this extra around to the front and sewing over the front edge section to make your binding all the way around. For best results, it is best to do this by hand, but I did not. I used my machine since I was keeping this, but it does make for a better finish to whip stitch this top binding by hand.

And done! This is a time consuming project I know. I think I had it laid out on my dining room table for about 3 days working on and off as time allowed, but like I mentioned above – use parts and piece of this as inspiration if you need to do something smaller. My activity mat is about 4′ square.


I want to say thank you for all who stop by to support my patterns and my blog. I have chosen to NOT do ads on my blog (with the exception of my affiliate links) and offer FREE patterns, but please – if you love my patterns and want to say a little thank you- or just have some good small business karma support points- a purchase now and then or a visit to any of my affiliate links really helps. It keeps this blog going so I can continue to offer free patterns for all to enjoy. I also purchase a pattern now and then or visit an affiliate link from my favorite blogs and designers. Thank you
This pattern is intended for personal use only. This pattern -and all my patterns- are offered for free or a small fee to help support my family so please do not redistribute, sell, copy or use them in any way not in accordance with fairness.
You may sell products made from this pattern, but please give me credit as the designer. Please do not use my photos as your own work, but you may use my photos to reference back to my blog, Etsy, Pinterest, IG or FB, but please link back to me.
If you find any problems with this pattern please let me know and if you have any problems with any of it feel free to message me and ask for support.
Kristi Bergin-Smith and The Burgundy Basket, 2020. Unauthorized use and/or duplication of this material without express and written permission from this site’s author and/or owner is strictly prohibited. Excerpts and links may be used, provided that full and clear credit is given to me, Kristi Bergin-Smith and The Burgundy Basket with appropriate and specific direction to the original content.

Will you be joining in the fun? I’d love for you to make all of this with me, but if not pick a few and make it with me.
I’d love to see all your work or catch up with your progress so connect with me over on IG @theburgundybasket
#youandmeabccrochet
XOXO,
Kristi
Our heelers, Ruger and Rebel get this box subscription every month – well, times 2! – and we LOVE IT!!! I highly recommend. We get one box that is just toys for Rebel our puppy since Ruger shares his treats with her.

Thank you so much for stopping by. I hope you are all enjoying this crazy, fun thing!! Catch up with me over @theburgundybasket on IG. I’d love to see you and your makes there.
Pin this post and come back for all of the A-Z toys! You can find a link to the original post below to start from the beginning!!

I realized after I started this project that I would never be able to update every new post with every new link – once I got down to the end of the alphabet, I would have to update about 20 post with all the links to all the new patters – So, I will be keeping THIS ORIGINAL POST updated with all the new links for all of the new toys. <3
In addition to the alphabet patterns, below you will find a list of toys that will be linked right here starting now. *these are not set in stone and I may decide to switch them as I work if I am inspired in a different direction. So, pin or save this post and come back and follow along with me or subscribe to my blog and get email updates when I make a new post.
Ball – for the ball toys in this project, I refer you to this post to make one – or many – crochet balls using your scrap yarns. The more textures the better. You can also add rattle boxes, squeakers, stress balls as filler and more. UPDATE: B is for Balls
Bunny – I have made a few bunnies in the past and I will be making another version of my Clover the Baby Bunny Pattern
UPDATE: Latte Bunny and B is for Bunny
Dinosaur – here on my blog you will find an entire Dinosaur Family. For this ABC event, I will be making a different version of Scrappy. He’s the perfect size and uses up some assorted scrap yarns. If you want a different option, Baby Pea is also a nice small size and also Pinky the Dezzy Inspired DRAGON is a good choice for D is for Dragon. UPDATE: D is for Dinosaur
Eye – I will be using the eyeball pattern from my Halloween Bag of Balls for this project. This one would be super cute with some crinkle paper inside. *Also, when you visit this post there is a Zombie ball that would make a cute Z word. UPDATE: E is for Eye
Goat – here on my blog you will find Ginger the Goat in my Farm Series. She is a bit large for this project so she will get a few modifications to be a bit smaller. Feel free to make her if you want a larger goat. *Baby KG will be available soon on my blog, but for now she is only in my Etsy and Ravelry.
Lamb– another make from my Farm Series is Lonny the Lamb. Lonny is a nice, small size so I will be using this pattern here for the Lamb, but will switch up the colors I’m sure. Maybe bright? Maybe a girl?
Octopus – in my opinion this octopus squeeze ball is the perfect baby toy when made from cotton so this is the pattern that I will be using right here. I like to use 100% cotton and the stress/squeeze balls on the inside of the head and it makes these the perfect baby toy with teether capabilities. And they are so quick to make you can make a handful.
Discover more from The Burgundy Basket
Subscribe to get the latest posts sent to your email.
One thought on “You, Me and the ABCs : Z is for Zipper : Zipper Fiddle Activity Mat”